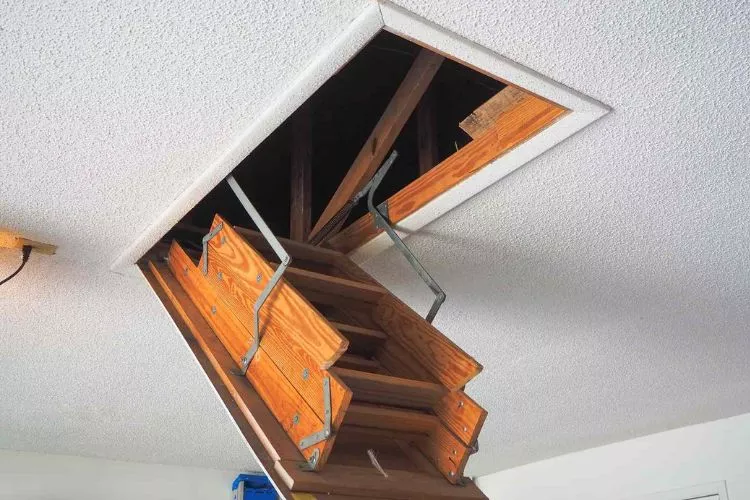
Maintaining an attic ladder warrants keen attention, especially its hinge arms, essential to safe and reliable operation.
But fear not if they break or become worn out. This article will provide a straightforward guide on how to replace an attic ladder hinge arms like a skilled handyman.

We’ll examine the step-by-step procedure, from tools to tips, ensuring your ladder remains safe and ready for those trips to the attic.
How to replace an attic ladder hinge arms? (A Step-By-Step Guide)
Ladder hinge arms are crucial components of an attic ladder, providing secure operation and preventing accidents. If you’ve noticed that the hinge arms on your ladder show signs of wear or damage, it’s time to replace them.
In this in-depth guide, we’ll walk you through the process of how to replace an attic ladder hinge arms, step by step.
🪜 Tools and Materials You’ll Need
- Replacement hinge arms
- Screwdriver or cordless drill with appropriate bits
- Adjustable wrench
- Socket wrench and a suitable socket
- Rubber mallet or soft-face hammer
- Safety glasses
- Mechanic gloves
- Ladder (if needed)
- Tarp or drop cloth (to protect the flooring)
- Penetrating oil (optional)

🪜 Step-by-Step Instructions
- Safety First: Before you begin, put on safety glasses and mechanic gloves to protect your eyes and hands while working. It’s also a good idea to have an additional person to help you secure the ladder and hand over tools, if needed.
- Extend the Attic Ladder Fully: To safely work on the ladder, make sure it’s fully extended and resting on a stable and even surface. This ensures easy access to the hinge arms and helps you avoid accidents. Place a tarp or drop cloth below the work area to protect your flooring.
- Inspect and Assess the Situation: Examine the ladder carefully to locate the hinge arms. Typically, there are two hinge arms on each side of the ladder. Understand how they connect to the ladder and the ceiling frame, as you’ll have to disconnect them later.
- Secure the Ladder: Ensure the ladder is stable and secure. Depending on its height, you may need an additional ladder to reach the top of the attic ladder. Use the adjustable wrench to stabilize and lock it in position if necessary.
- Remove the Hinge Arms: Remove the screws or bolts connecting the hinge arms to the ladder and ceiling frame. For this, you may use a screwdriver, adjustable wrench, or socket wrench, depending on the fastener type. If the fasteners are stuck, applying penetrating oil can help loosen them.
- Once the fasteners are removed, detach the hinge arms from the ladder and ceiling frame by pulling them apart or gently tapping them with a rubber mallet.
- Install the New Hinge Arms: Place the new hinge arms in the same position as the old ones. Align the holes on the hinge arms with those in the ladder and ceiling frame accordingly. Insert the provided screws or bolts and use the screwdriver, adjustable wrench, or socket wrench to tighten them securely. Ensure both hinge arms are tightened evenly to avoid any imbalance in the ladder.
- Test the Ladder: Test the ladder’s functionality after successfully replacing the hinge arms. Ensure the extension and retraction work smoothly and the ladder is secure. Keep an eye out for any gaps or misalignments in the hinge arm connections.
- Clean Up: Once satisfied with the replacement, clean up your workspace. Put away tools, fasteners, and tarp or drop cloth. Dispose of the old hinge arms properly.
Congratulations! You’ve successfully replaced your attic ladder hinge arms, ensuring a safer and more reliable ladder experience.
Attic ladder repair usa cost
The cost of attic ladder repair largely depends on the complexity of the repair job and the region you live in. For a complete replacement, including labor and materials, prices can range from $350 to $1,000 on average.
More complex installations requiring structural modifications or a high-end ladder can cost between $1,000 and $2,500.

It is important to note that these costs are just estimates – the actual price can vary based on a variety of factors, including the specific issue with the ladder, the type of ladder, local labor rates, and whether additional services (like old ladder removal or wood trim installation) are needed.
Generally, getting several quotes from different professionals is always a good idea before deciding on the one to hire for the repair. This will allow you to compare costs and potentially save money.
Conclusion:
Replacing attic ladder hinge arms doesn’t need to be a daunting challenge. By ensuring you have the right tools and following the detailed instructions outlined in this guide, you’re well-equipped to handle this task.
Remember, consistency in maintenance can significantly increase the lifespan of your attic ladder. If you ever detect any signs of wear or damage on the hinge arms, do not hesitate to replace them to ensure safety in your trips to and from the attic.


